Editing HTML in Flex Builder 3

March 28th, 2009 47 comments

Rarely have I ever had a need to edit HTML in Flex Builder. Other editors (Dreamweaver, for instance) were always available or I managed to get by with Flex Builder’s built-in plain text editor. Lately, however I’ve been working with HTML and Flex together more often and I decided to hunker down and get an HTML-editor plug-in installed in Flex Builder.

A quick solution was installing the PHP Development Toolkit plug-in (PDT) which could handle not only PHP code hinting and editing (if you needed that sort of thing), but also handled HTML as well.

Here were the steps I had to run through to get the PDT plug-in working in Flex Builder 3. First, we’ll need to install some pre-requisite frameworks and tools (like GEF, EMF and WST):

• First, from within Flex Builder, click

        Help –> Software Updates –> Find and Install –>
        Search for new features to install

• Check Europa Discovery Site and click Finish

• Expand Europa Discovery Site results

• Uncheck “Show the latest version of a feature only

• Find these groups and check the version listed:

        Graphical Editors and Frameworks
          • Graphical Editing Framework 3.3.2

        Java Development
          • Eclipse Java Development Tools 3.3.2

        Models and Model Development
          • Eclipse Modeling Framework (EMF) Runtime + End-User Tools 2.3.2
          • XML Schema Infoset Model (XSD) Extender SDK 2.3.2

        Web and JEE Development
          • Web Standard Tools (WST) Project 2.0.2

• Click Next

• Click the I accept the terms in the license agreement radio button

• Click Finish

Now that that’s done, we’ll get on to the PDT installation:

• From within Flex Builder again, click

        Help –> Software Updates –> Find and Install–>
        Search for new features to install

• Click New Remote Site, and type in “PDT” for the name and http://download.eclipse.org/tools/pdt/updates/ for the URL

• Click Finish

• Uncheck “Show the latest version of a feature only

• Expand PDT

• Check PDT SDK 1.0.3 and click Finish

• Restart the Flex Builder workbench

• Once Flex Builder has restarted, click Window in the upper toolbar, then click

        Preferences –> General –> Editors –> File Associations

• Select “.html” and “.htm” and for each extension highlight “HTML Editor” and click Default. .
• Once you’re all done click OK.

That’s it!

Categories: Adobe Flash, Adobe Flex Tags:

Internet Explorer 8 Released

March 20th, 2009 14 comments

Microsoft unveiled Internet Explorer 8 at its MIX09 Web Developer conference in Las Vegas yesterday.

You can download the latest (and greatest?) version here:
http://www.microsoft.com/windows/internet-explorer/default.aspx

The company bills Internet Explorer 8 as more secure and easier to use than its predecessor, IE7. In Microsoft’s words, the new browser “blocks two to four times more malware attacks than other browsers; cuts down on the time it takes to complete common tasks on the Web such as searching, mapping and sharing, including navigating 15 of the 20 top worldwide sites; and blurs the lines between the services they use daily and the browser used to access the Internet.”

An “Instant Search Box” will enable search from sites including The New York Times, Amazon.com and Wikipedia.

The browser will come automatically packaged with unlaunched Windows 7.

Categories: General Tags:

Extending the Flex TextInput control to colorize background on focus

March 7th, 2009 588 comments

Normal Flex TextInput controls automatically give you that “halo” border whenever the user highlights or sets focus to a text field. Although when Flex first came out, I thought the halo border was a very slick way to show focus, but now I want it to be even more obvious to the user as they tab through a form a select a field for text entry.

First thing I did was create a new ActionScript component that extended TextInput. My new control would work every bit the same as the standard TextInput and only wanted to alter what happens when the fields focus event was fired. Luckily, all I had to do was override the focusIn and focusOut handler’s, call super() to execute any standard logic in the parent method, and set my styles.

The resulting component ended up like this:

1
2
3
4
5
6
7
8
9
10
11
12
13
14
15
16
17
18
19
20
21
22
23
24
25
26
27
28
29
30
31
32
33
34
35
36
37
38
39
40
41
42
43
44
package components
{
	import flash.events.FocusEvent;
 
	import mx.controls.TextInput;
 
	/**
	 * Extends normal TextInput control but overrides focusIn and focusOut handlers
	 * to colorize the background color of the TextInput control differently when
	 * highlighted/focused
	 */
	public class MyTextInput extends TextInput
	{
		/**
		 * Constructor
		 */
		public function MyTextInput()
		{
			super();
		}
 
		/**
		 * Overrides focusInHandler to colorize background on focusIn events
		 */
		override protected function focusInHandler(event:FocusEvent):void
		{
			super.focusInHandler( event );
 
			//backgroundFocusInColor derived from master style-sheet
			this.setStyle('backgroundColor', getStyle('backgroundFocusInColor'));
		}
 
		/**
		 * Overrides focusOutHandler to reset background on focusOut events
		 */
		override protected function focusOutHandler(event:FocusEvent):void
		{
			super.focusOutHandler( event );
 
			//backgroundFocusOutColor derived from master style-sheet
			this.setStyle('backgroundColor', getStyle('backgroundFocusOutColor'));
		}
	}
}

Note the getStyle function calls. Typically, I keep all style-related colors and property values stored in a master style-sheet for my applications. This keeps the style-related values out of the views so I can easily manage them in one place.

For this new control, I defined a component-level type (or “class”) selector in my master CSS. Since this component extends TextInput, the normal styles for TextInput also apply, whereas the styles specified in the MyTextInput selector apply only to this control. Keep in mind, the “backgroundFocusInColor” and “backgroundFocusOutColor” properties are entirely made up and are not real component style properties, but it is totally legal to come up with your own style properties!

1
2
3
4
5
MyTextInput
{
	backgroundFocusInColor	: #DFF8FF;
	backgroundFocusOutColor : #FEFFAF;
}

Lastly, anywhere in my views I wish to use this component, I simply specify the newly built control:

1
<components:MyTextInput id="myTextInput" />

That’s it!

Categories: Adobe Flex Tags:

Free Flex Builder!

February 25th, 2009 33 comments

Andrew Shorten, one of the Platform Evangelists at Adobe, has mentioned recently that Adobe has announced that if you’re a developer or aspiring developer and have recently been laid off, you can qualify for a free version of Flex Builder – an idea that is targeted to increase your skill set in Flex while looking for your next gig.

Although the announcement was made via a British website, the free tool is available to anyone in the world, as long as they contact any Adobe evangelist (like Shorten). You can also KEEP your copy of Flex Builder once you do find that new job. But if you’re like me and are reading this, you probably already have several copies of FB laying around and some that haven’t even been released ;)

http://www.digitalartsonline.co.uk/news/index.cfm?NewsID=12218

Categories: Adobe Flex, Websites Tags:

Flex Required Field Indicator

February 20th, 2009 43 comments

Ever wanted to create your own textual component that sits outside of a Flex Form (and FormItem tag) that still uses the same required field indicator?

After trying to duplicate the little red asterisk using styles or even creating my own graphically, I opted to use the same one that comes part of the Flex SDK inside Assets.swf:

1
2
3
4
5
6
7
8
9
10
11
12
13
14
15
<?xml version="1.0" encoding="utf-8"?>
<mx:HBox xmlns:mx="http://www.adobe.com/2006/mxml"
    horizontalGap="0" verticalAlign="middle" horizontalAlign="right" 
    height="18" width="100%"
    paddingBottom="0" paddingTop="0"
    styleName="requiredFieldLabel">
 
	<mx:Image 
	    source="@Embed(source='Assets.swf',symbol='mx.containers.FormItem.Required')" 
	    height="7"/>
 
	<mx:Label text="indicates required field" 
	    styleName="requiredFieldLabel"/>
 
</mx:HBox>

Here’s what you’d see:
required_field

Categories: Adobe Flex Tags:

Flex SDK Coding Standards & Best Practices

February 19th, 2009 5 comments

I think this subject probably gets asked a lot by most new Flex programmers. Unfortunately, most of the companies I have worked for did little to enforce or even develop coding standards. Larger companies typically make it a priority to develop standards simply due to the number of incoming and outgoing contractors hired for specific projects. Lack of standards can cause code nightmares later on and virtually no project maintainability.

A good starting point for standards can be from Adobe themselves, who have come up with a nice document detailing basic Flex coding conventions and best practices. See for yourself!

http://opensource.adobe.com/wiki/display/flexsdk/Coding+Conventions

Categories: Adobe Flex, Websites Tags:

Flex magazines

February 18th, 2009 6 comments

Adobe Flex has been out for about five years now and although it is still quite young, a handful of printed magazines have arisen to extol the virtues of this powerful platform.

Try these out for yourself!

Flex Authority Magazine
Flash & Flex Developer’s Magazine
Flex Developer’s Journal

Categories: Adobe Flex Tags:

Flash Player 10 Coming in 2010 to Mobile Smartphones

February 17th, 2009 3 comments

At Adobe MAX San Francisco, I remember Kevin Lynch (CTO, Adobe) speaking in his keynote about the fact that they have been working to get Flash Player 10 on smart-phones. Considering Flash Player 10 had been released just a short time before MAX, we knew it would take quite some time for that realization to come true. However, today at the GSMA Mobile World Congress in Barcelona, Adobe announced a date. In early next year, Flash Player 10 should be available on smartphones running Windows Mobile, Google’s Android, Nokia S60/Symbian, and the new Palm operating systems.

Currently, about 40% of mobile phones come shipped with Flash Lite. With the introduction of the full Flash Player 10 engine to smartphones, developers can now trust that their applications will run, without dumbing their code down to AS2 or Flash Lite.
Read the full article here: http://reviews.cnet.com/8301-13970_7-10164745-78.html
Categories: Adobe Flash Tags:

Cocomo is no longer

February 12th, 2009 17 comments

Cocomo has now switched from it’s internal codename (after “Common Collaboration Model”) to the Adobe Flash Collaboration Service. This comes as Adobe prepares to offer their hailed Platform as a Service commercially. Read the full article here: http://blogs.adobe.com/collabmethods/2009/02/cocomo_is_now_adobe_flash_coll_1.html

Or, go directly to the new Adobe Flash Collaboration Service landing page:
http://labs.adobe.com/technologies/afcs/

Categories: General Tags:

Adobe Developer Connection on iTunes

February 8th, 2009 4 comments

iTunes has lots of podcasts available, including software video how-to’s. Now you can get your fill of Flex tutorials (and everything else Adobe) now that the Adobe Developer Connection has been added to the list. See for yourself!

Adobe Developer Connection on iTunes

Adobe Developer Connection on iTunes

Categories: General Tags:

Custom Thought Bubble ToolTip Component

February 7th, 2009 13 comments

Someone asked if I could create a talk or thought bubble component similar to talk bubbles in cartoons. Of course, not having done this sort of thing before I started going over the possible ways of doing such a thing in my head.

  • Create a “skin” in Photoshop or Illustrator, embed that skin in a custom component or in a stylesheet and go from there
  • Customize the ToolTip Manager somehow to get it to do what I want
  • Create a custom component in Flex that used the ActionScript graphics API to draw the talk bubble

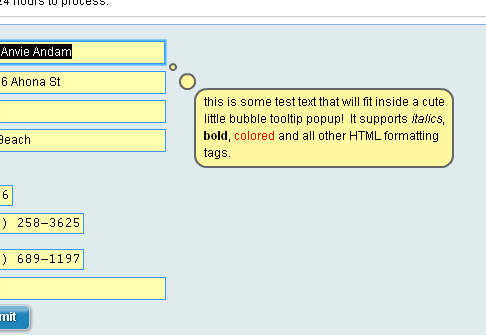
There might have been other ways but these were the first that came to mind. I realized I needed the talk bubble to expand or shrink depending on its textual (or non-textual) content. And I needed it to be easy for other developers to drop right into their applications without too much hassle. So I settled on #3, and after a mere two hours of work came up with this idea:

Talk Bubble ToolTip (down direction)

Talk Bubble ToolTip (down direction)

From the code snippet below you can see I simply created a new component in ActionScript which extended the Text component within the Flex SDK. I ensured that the visible and includeInLayout properties were set to false so that the bubble tooltip would only appear when the view set those values to true, say on a focus or mouse-over event.

Then, using the ActionScript graphics API, I drew three (3) rounded rectangles with the third’s dimensions calculated based on the textField’s content. The TextField itself is an inherited property of Text.as. I had to move the x & y coordinates of the textField so that it fit right over the third rectangle. In all, this gives us the appearance of a talk bubble! (sample example of usage is in the comments)

1
2
3
4
5
6
7
8
9
10
11
12
13
14
15
16
17
18
19
20
21
22
23
24
25
26
27
28
29
30
31
32
33
34
35
36
37
38
39
40
41
42
43
44
45
46
47
48
49
50
51
52
53
54
55
56
57
58
59
60
61
62
63
64
65
66
67
68
69
70
71
72
73
74
75
76
77
78
79
80
81
82
83
84
85
86
87
88
89
90
91
92
93
94
95
96
97
98
99
100
101
102
103
104
105
106
107
108
109
110
111
112
113
114
/**
 * BubbleToolTip is a simple all-inclusive textual component that, when visible, will
 * display a "thought bubble" tool-tip container wherever the tag is placed within a layout
 * container (VBox, HBox, FormItem, etc).
 * 
 * This extends mx.controls.Text so all properties and methods available via Text.as are
 * available here.
 * 
 * Sample Usage:
 * 
 * <mx:FormItem id="emailForm"
 *		<mx:TextInput id="inpEmailAddress" 
 * 		focusOut="bubbleToolTip.visible = false"
 * 		focusIn="bubbleToolTip.visible = true"/>
 * 				
 * 		<components:BubbleToolTip id="bubbleToolTip"
 * 		x="{inpEmailAddress.x + inpEmailAddress.width}" 
 * 		y="{inpEmailAddress.y}"
 * 		width="250" direction="up"/>
 * </mx:FormItem>
 *
 * 
 * Sample Style: 
 * 
 * BubbleToolTip
 * {
 *		background-alpha		: 0.85;
 *		background-color		: #FFF79F;
 *		border-color			: #666666;
 *		color				: #000000;
 *		font-family			: Arial;
 *		font-size			: 12px;
 * }
 *
 * 
 * @author Erich Cervantez
 * @date 01/13/2009
 */
 
package 
{
	import mx.controls.Text;
 
	public class BubbleToolTip extends Text
	{
		/**
		 * Specifies the padding between text and bubble border
		 */
		private const PADDING : Number = 8;
 
		/**
		 * @private
		 */
		private var m_direction : String;
 
		/**
		 * Specifies the direction (up,down) of the bubble
		 */
		[Inspectable(category="General", enumeration="up,down", defaultValue="down")]
		public function get direction() : String
		{
			return m_direction;
		}
		public function set direction( value : String ) : void
		{
			m_direction = value;
		}
 
		/**
		 * Constructor
		 */
		public function BubbleToolTip()
		{
			super();
 
			visible = false;
			includeInLayout = false;
		}
 
		/**
		 * Draw the customized text container whenever updateDisplayList is triggered
		 */
		override protected function updateDisplayList( unscaledWidth:Number, unscaledHeight:Number ) : void
		{   			
   			super.updateDisplayList( unscaledWidth, unscaledHeight );
 
   			textField.x = textField.x + ( m_direction == "down" ) ? 32 : 35;
   			textField.y = textField.y + ( m_direction == "down" ) ? 28 : -( textField.height + PADDING/2 );
 
   			var calHeight : Number = textField.height + PADDING;
   			var calWidth : Number = textField.width + PADDING;
 
   			x = x + 5;
 
			this.graphics.clear();
 
		    this.graphics.beginFill( getStyle('backgroundColor'), 1 );
		    this.graphics.lineStyle(2, getStyle('borderColor'), 1);
		    this.graphics.drawRoundRect(0, 0, 6, 6, 24, 24);
		    this.graphics.endFill();
 
		    this.graphics.beginFill( getStyle('backgroundColor'), 1 );
		    this.graphics.lineStyle(2, getStyle('borderColor'), 1);
		    this.graphics.drawRoundRect(10, m_direction == "down" ? 10:-10, 15, 15, 24, 24);
		    this.graphics.endFill();
 
		    this.graphics.beginFill( getStyle('backgroundColor'), 1 );
		    this.graphics.lineStyle(2, getStyle('borderColor'), 1);
		    this.graphics.drawRoundRect(m_direction == "down" ? 25:30, m_direction == "down" ? 25:-calHeight, 
		    	calWidth, calHeight, 24, 24);
		    this.graphics.endFill();
		} 
	}
}

Again, this was based on just a couple of hours of work. If anyone has some suggestions or additions to this bubble tooltip component, please let us know!

Categories: Adobe Flex Tags:

LinkedIn Profile Updated

February 1st, 2009 27 comments

Want to know more about your favorite Flex Evangelist?

http://www.linkedin.com/in/ErichCervantez

Categories: Websites Tags:

Flex Camp OC was great!

February 1st, 2009 19 comments

Spent most of the day yesterday at Flex Camp in Orange County and it was probably the best $25 I ever spent (well for a conference anyway).

All of the topics sparked a lot of interest in the crowd of about 100 people packed into a conference room at the Boeing complex in Huntington Beach. The most notable were Evan Gifford’s Flash/Flex showcase and Tom Gonzalez and Juan Sanchez’s Degrafa overview. Thomas Burleson covered “behavior injection” concepts that I would love to steal if I ever get the chance ;)

Here were some pics:

Categories: Events Tags:

FREE Edition of TurboTax uses Adobe Flex

January 29th, 2009 6 comments

So my wife and I did our taxes last night. I usually use TurboTax online for our taxes and this year would be no different, however I decided to try out the FREE version online just to see if I could. Our return for last year was very simple with just two W-2′s, two dependents and that’s it, so why not?

Interestingly, the FREE edition of TurboTax online uses Flex. It was unmistakable. After a little digging, it appears this Flex version was released last year as TurboTax Personal Pro, however that name has been discontinued in favor of “Free Edition”. Music to my ears…

Categories: Websites Tags:

QTP and Flex Builder 3

January 29th, 2009 15 comments

I wasn’t immediately aware of this, but if you’re attempting to use HP’s QuickTest Professional (QTP) with your Flex 3 application and find that the QTP tool (during recording) causes this alert popup to display in your application:

“License not present. With the trial version only limited records are allowed.”

It is because you probably (like me) grabbed the four swc’s needed for automation and QTP from Flex Builder 3′s “sdks” folder (under frameworks/libs): automation.swc, automation_agent.swc, automation_dmv.swc and qtp.swc.

Normally this would work just fine, unless you have the Standard edition of Flex Builder. You’ll find if you upgrade to the Professional version, you’ll get access to the full licensed version of these swcs (rather than the trial versions included with the Standard edition) and the popup message will go away.

Flex Builder 3 Professional also includes a few other features that may or may not be worth the $699 price tag: http://www.adobe.com/products/flex/buy/

Categories: Adobe Flex Tags:

Flex Camp coming to Orange County!

January 25th, 2009 9 comments

From flexcampoc.com:

Start 2009 off right by beefing up your Flex skills. Flex Camp OC is a full-day event featuring some top industry experts on Adobe Flex and AIR. Come advance your Flex skills and network with local companies and fellow developers. Sessions will be geared towards developers with moderate to advanced level of experience with Flex and/or ActionScript. There will be plenty of giveaways, raffles and swag.

When: Saturday, January 31, 2009
Where:Boeing, Huntington Beach, CA
Price:$25 Admission

FLEX CAMP LOGO

Categories: Events Tags: